To configure the Horiba Pentra C400/ 400 to connect to Relaymed via the Horiba LiteDM Software the following configuration stages are required:
- Contact Horiba on 888-903-5001 option 4 to open an interface request. You'll need their device serial number and a POC.
- Arrange an interface device connectivity call between Horiba and Relaymed
- Horiba Pentra C400/ 400 Connection Configuration
- Lantronix xDirect Adapter Configuration
- Add device to Relaymed Software Agent
Stage One: Connection Configuration - via the LiteDM Software
Step 1: From the main screen select the icon shown below (highlighted in red)
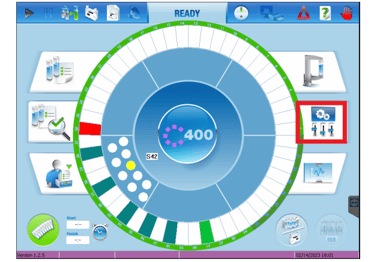
Step 2: Select the lower left icon (highlighted in red)

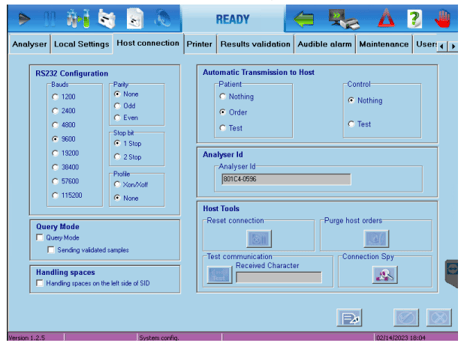
Step 3: Select the Host Communications tab and ensure the follow
RS232 Configuration
- Bauds: 9600
- Parity: None
- Stop Bit: 1
- Profile: None
Automatic Transmission to Host
- Patient: Order
- Control: Nothing
Step 3: Send a test over using the recall functionality on the device
Stage Two: Lantronix Configuration
Step 1: Connect the Lantronix xDirect to the directly to the RS232 output cable of the LiteDM data cable.
Step 2: Follow the Lantronix xDirect configuration guide to correctly configure the adapter to connect to your network.
Stage Three: Add Device to Relaymed
To add the Horiba ABX Pentra C400/400 to Relaymed follow the Add Ethernet device to Relaymed Software Agent Guide
Troubleshooting
If the device is configurated to use identifiers rather than HL7 format and the U and V identifier fields swap unexpectantly the patientID will start coming through in the sampleID field and vice versa. There is a setting where you can switch the parameters back.
View this article to complete EHR mapping with the device analyte Horiba ABX Pentra C400 and Pentra 400 - Panels