Configuring the Base unit

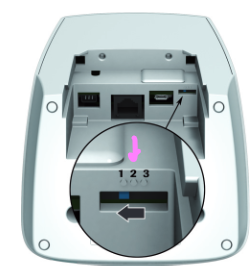
- To configure the Accu-Chek Inform II, first set the configuration switch on the base unit to position 1

- Connect the power supply to the power input jack
- Connect the USB cable to the base unit and the PC
- After finishing the startup process the status LED will light up blue. The base unit is now ready for configuration
- The base unit will be mounted as a removable drive on the PC after these steps. Next we edit the configuration file on the PC we connect the base to so it will be ready for Ethernet Mode
- Open the file explorer window of the computer that the base unit is connected to by USB
Open the BseConf.xml file using a test editor. It will look similar to this:

The following Parameters need to be set to successfully enable Ethernet mode:

- Change DHCP to "enable" (the customer can decide to enter the IP address and subnet mask manually if they do not want to enable DHCP)
- DMSHost will be the IP with the Relaymed Software Agent installed
- DMSPort will be the port number assigned to the Accu-Check Inform II when it was added to the Relaymed Software Agent
- Once done, save your changes and close the editor. Wait until the base unit disconnects and then reconnects as a mass storage device
- Open the BASEConf.log to verify the configuration has been finished without errors, additionally you can reopen the BASEConf.xml to ensure changes saved
- Set the configuration switch on the base unit to POSITION 2 to change the communication mode to POCT1-A/Ethernet mode
- You may now dock the the actual Accu-Chek Inform II to the base unit to check connectivity. It will automatically try to connect to the Relaymed Software Agent when docked
- If the Status LED lights up red: Power supply is connected, application is still starting up
- If the Status LED lights up green: Ready (desired state)
- Flashed RED: Error. See Trello connectivity guide, page 28 for Troubleshooting Network Configurations - Ethernet mode
- Lights up blue: It's still in Configuration mode, set configuration switch to position 2 for Ethernet mode. This switch is rather small, and sometimes is not put in the correct position
- The device needs to run a real test, then be docked again into the base unit for it to transmit a test and show a time stamp in the Relaymed Software Agent. There is no "recall result" or similar option for this device